

Overview
Conveo supports the following stimulus types:- Single Image
- Image Comparison
- Randomized Stimuli
- Uploaded Video
- YouTube Video
- Figma Design
- Canva Embed
- Link
Adding a Stimulus
To add a stimulus to a question or section:- Navigate to your Topic Guide.
- Open the question where you want to display content.
- Click Add Stimulus.
- Select Create Stimulus.
- Choose the desired stimulus type.
- Configure the stimulus.
- Click Attach to link it to the question.
Single Image
Upload one image to display alongside a question. Typical use cases:- Concept visuals
- Packaging designs
- Advertisements
- Product mockups
Image Comparison
Display multiple images side-by-side for direct comparison. Typical use cases:- A/B testing
- Logo comparisons
- Before/after testing
- Design preference evaluation
Randomized Stimuli
Use randomized stimuli when you need to systematically control which respondents see which concepts, messages, or variations. Conveo prioritizes less-used concept groups and randomizes between equally eligible choices. This helps distribute exposure and reduce order effects. It does not guarantee equal completed samples, unbiased recruitment, or statistically valid comparisons; these also depend on your study design and participant behavior.Monadic vs Sequential Monadic
Set Number of stimuli to show per participant (above the table) to control how many variants each respondent evaluates:
Balancing is automatic, but approximate. In the default draw, a concept counts toward balancing after an associated interview question has been answered. In screener-directed allocation, the assignment itself counts, including interviews still in progress. Live balancing excludes test, hidden, deleted, screened-out, and abandoned interviews. Monitor completed results separately and use quotas when you need admission limits.
The Stimulus Table
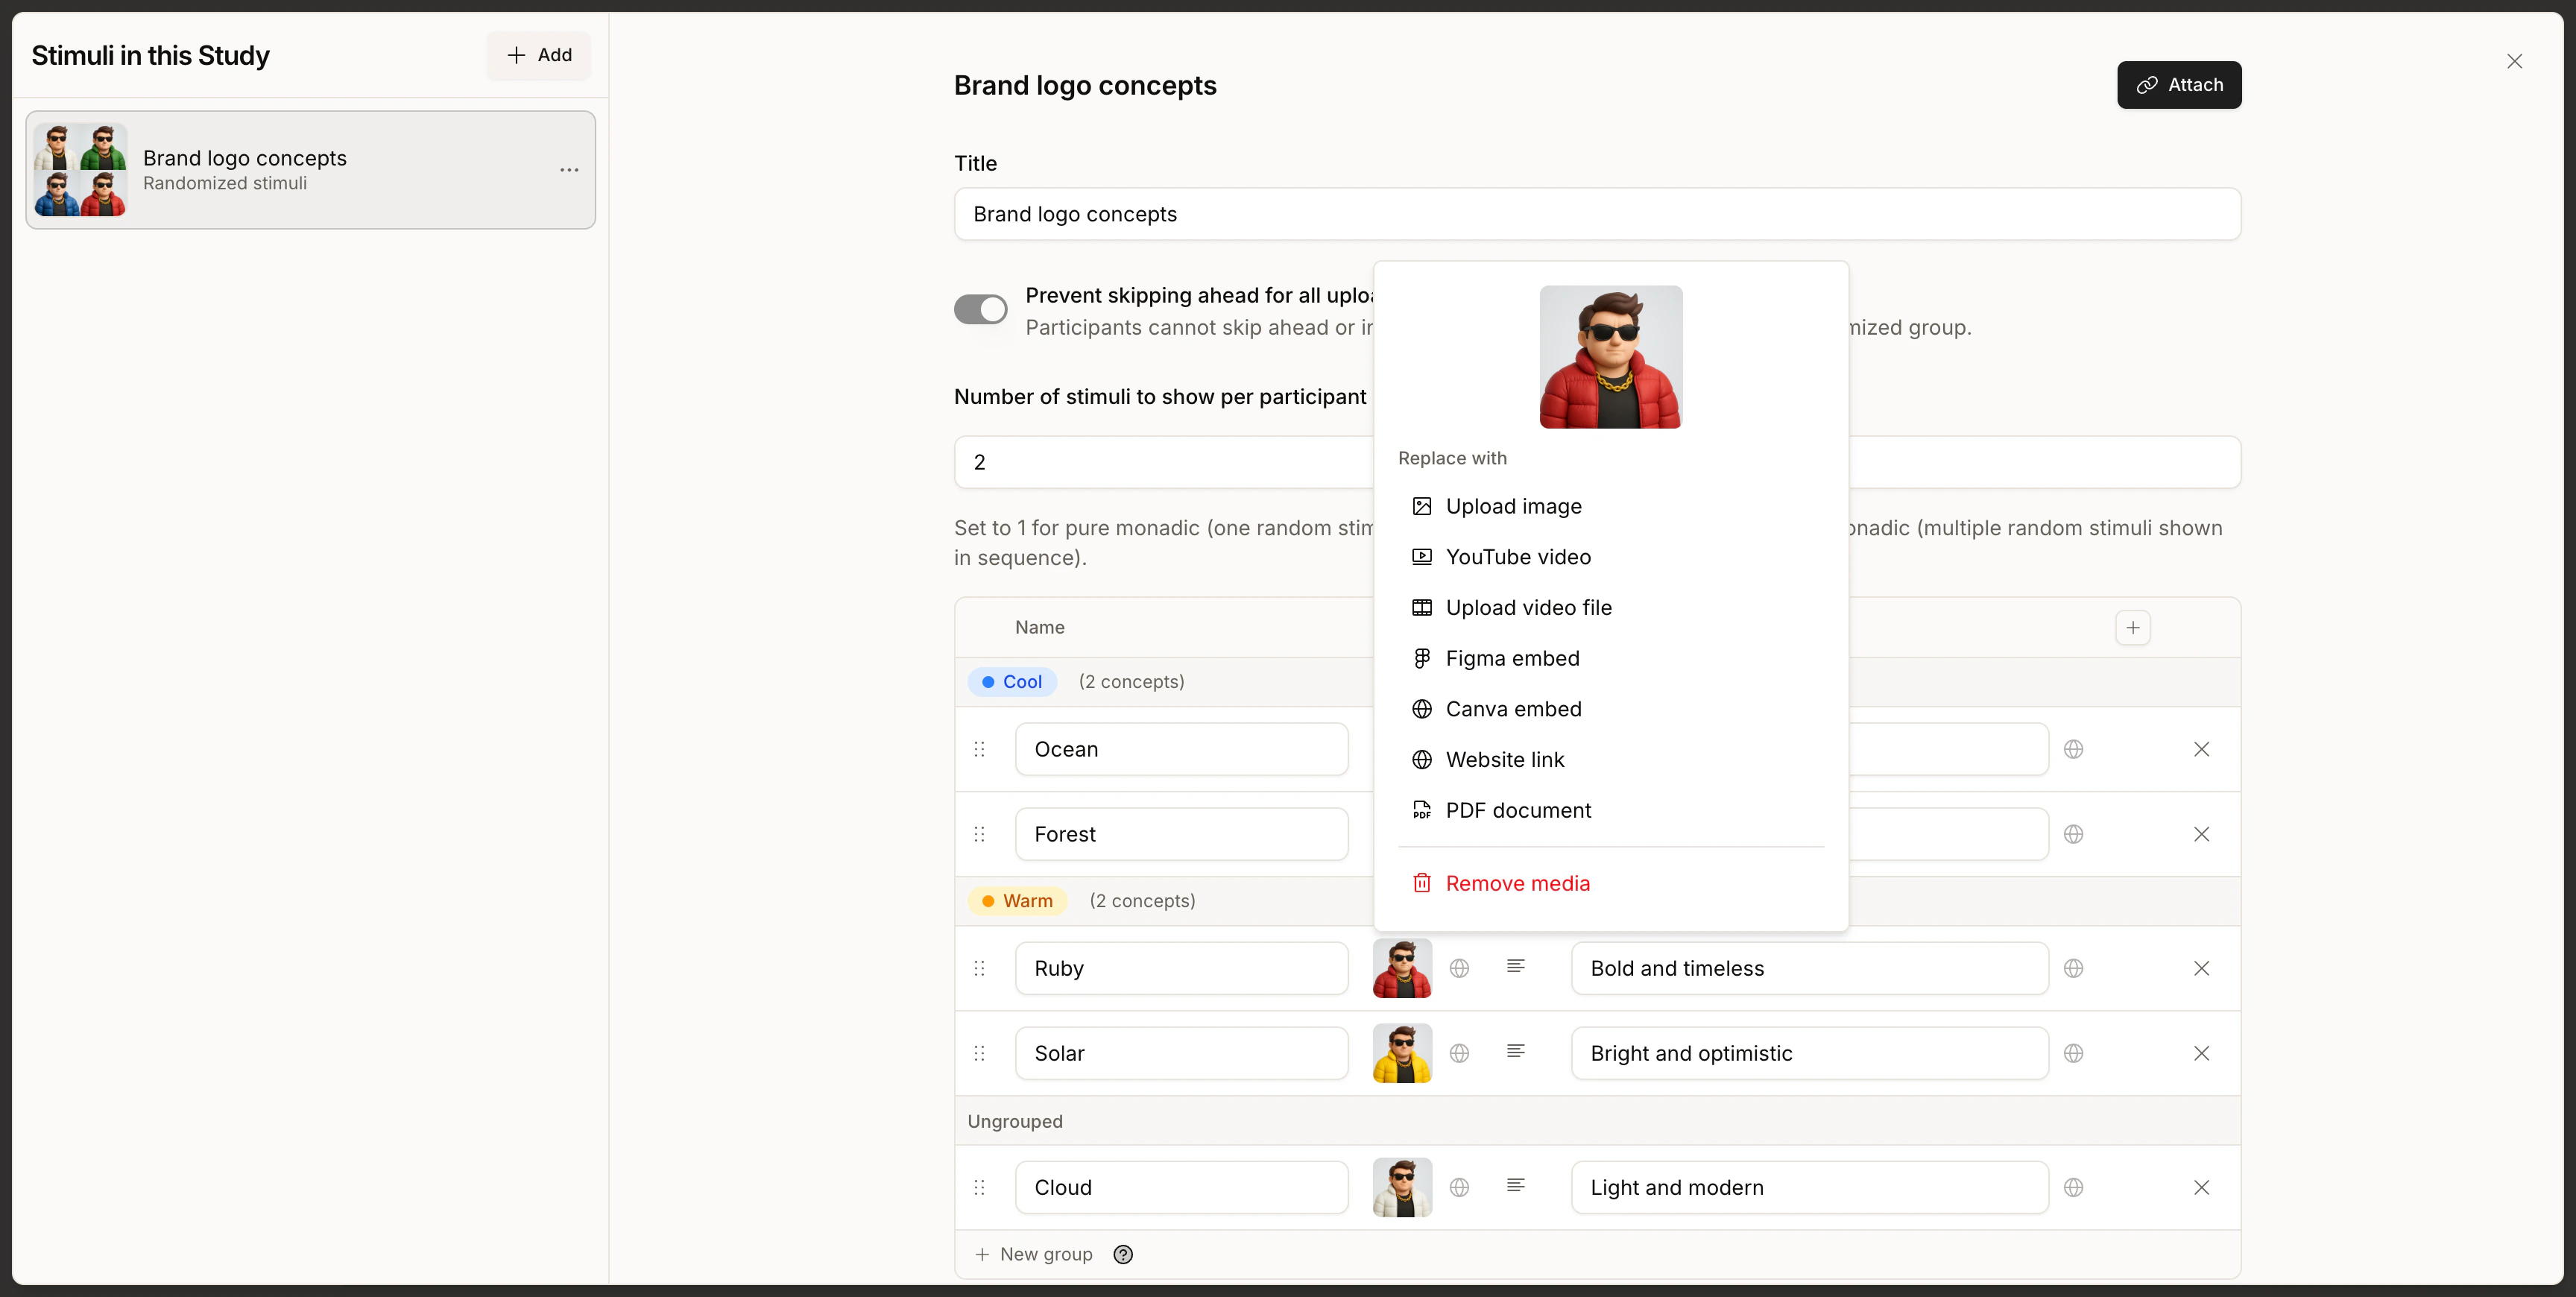
Randomized stimuli are configured in a table editor. Each row is one concept (variant), and the columns describe how that concept should show up in the interview.
There are two ways to add concepts:
- Drop images onto the dropzone at the bottom of the table to bulk-upload. Each image (JPG or PNG, up to 10 MB) creates its own row, with the file name used as the concept name — the fastest way to seed a new stimulus when you already have the assets ready.
- Click Add concept to create a blank row and fill in the cells manually. Use this for any asset type the dropzone doesn’t support — videos, YouTube links, Figma prototypes, Canva designs, website links, or PDFs.
Parameters
Parameters let a single question text adapt to whichever concept is being shown. You define a placeholder once in the question, and each concept supplies its own value.- In the stimulus table, click the + button in the column header row and name the parameter (e.g.
brand,price,tagline). A new column appears. - Fill in a value for each concept in that column.
- In the question text, follow-up context, or multiple-choice options of any question this stimulus is attached to, reference the parameter with double brackets:
[[ tagline ]]. Conveo highlights these placeholders in violet so you can spot them at a glance.
- Question: “Does this brand feel [[ tagline ]] to you? Why or why not?”
- Ruby concept,
tagline = "Bold and timeless"→ “Does this brand feel Bold and timeless to you? Why or why not?” - Ocean concept,
tagline = "Deep and trusted"→ “Does this brand feel Deep and trusted to you? Why or why not?”
Groups (Mutual Exclusivity)
Groups let you organize concepts into sets. For each participant, Conveo picks at most one variant from each set, preventing participants from seeing multiple variants from the same group. To create a group, click New group below the table, then drag concept rows into it. You can also drag a row onto an existing group to join it, or drag it out to ungroup. Groups are color-coded so you can tell them apart at a glance. Click the group name to rename it. Example use cases:- Mutually exclusive variants: Concept A and Concept B are two versions of the same ad. Put them in one group so no participant sees both.
- Crossed designs: One group holds brand variants, another holds price variants. With a count of two and both groups eligible, each participant sees one from each group.
Screener-Directed Allocation
By default, Conveo assigns concepts the moment the interview loads — before the screener runs. Screener-directed allocation moves the assignment to after the screener, so a participant’s own answers can decide which concept they get. Use it when a concept only makes sense for some participants. For example, in a study about in-store shopping, you can send each participant to a retailer they actually shop at, and balance the categories they’re asked about within that retailer.Requires enablement for each study. Ask the Conveo team to enable screener-directed allocation for the study. Organization access alone does not enable it. Configure at least one concept eligibility rule to activate the deferred draw; turning on access or setting Balance within alone does not change allocation timing.
- Concepts are assigned after the participant passes the screener, not when the interview loads.
- Each concept can carry an eligibility rule, so only participants whose screener answers match can be given it.
- Another randomized stimulus can be balanced within the first, instead of balancing on its own.
Restricting Who Can Get a Concept
Each row in the stimulus table gets an Eligibility cell. It reads All participants until you add a rule, and Restricted once you have.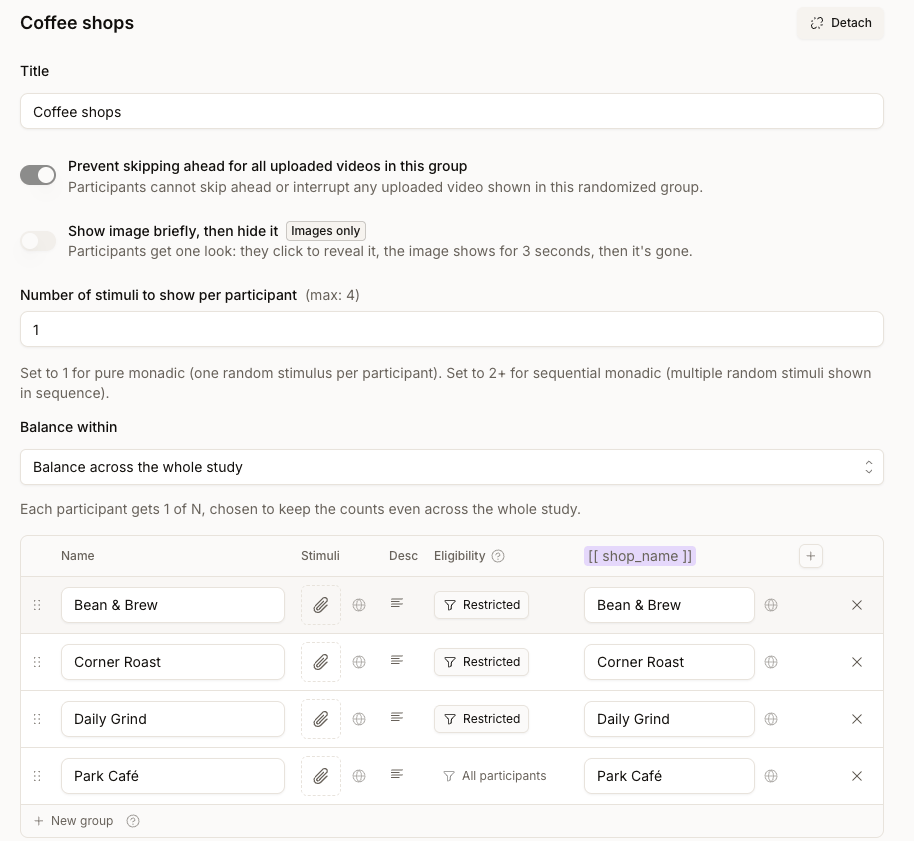
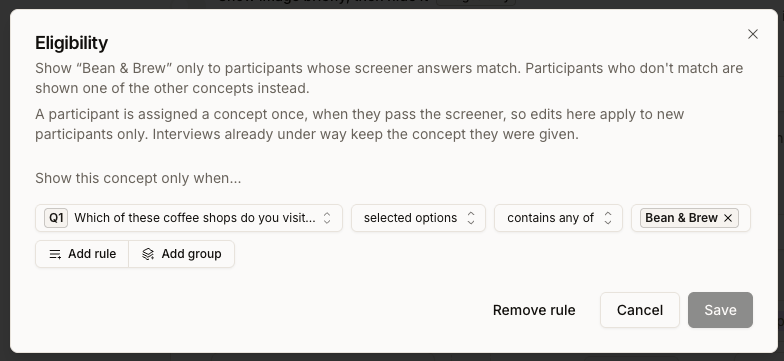
- Concepts with no rule stay open to everyone. You can restrict some rows and leave others unrestricted in the same table.
- The rule must reference a question the participant actually answered. If the rule points at a question they skipped or were routed past, the concept counts as not eligible for them.
- Rules use screener answers only. Choice answers, selected-option counts, and Open text classification categories are supported. Participant properties, diary entry numbers, and another stimulus’s assignment cannot be used as eligibility conditions.
- The rule builder needs screener questions. With none in the study, the Eligibility cell is disabled and tells you to add a screener question first.
- Edits apply to new participants only. A participant is assigned their concept once, when they pass the screener. Changing a rule mid-field never moves someone who has already started.
Number of Stimuli to Show Becomes a Maximum
Number of stimuli to show per participant still sets how many concepts each participant evaluates, but Conveo never hands someone a concept they aren’t eligible for just to reach that number. A participant eligible for fewer concepts than the count simply gets fewer. Group restrictions still apply: at most one concept is selected from each group. If a participant is eligible for nothing in a randomized stimulus, they’re screened out. In the interviews list they show as Screened out, and the status tooltip explains why: “This participant’s screener answers matched none of the stimuli the study can show them.”Balancing One Draw Inside Another
When a study has two or more randomized stimuli, each one balances independently by default. That’s usually what you want — but it means one concept from the first stimulus can end up paired mostly with one concept from the second. Use Balance within, just below Number of stimuli to show per participant, to balance those combinations. Leave it on Balance across the whole study for independent balancing, or pick another randomized stimulus to nest inside it. For an active screener-directed setup, Conveo draws the outer stimulus first and prioritizes less-used inner concepts within the assigned outer concept. The outer stimulus must also be attached to the interview; merely creating it is not enough. The setting only appears once the study has another randomized stimulus to nest inside. Nesting goes two levels deep — an outer draw and an inner one. You can’t nest inside a stimulus that is already nested in something else. A stimulus that already has other stimuli balanced within it cannot itself become an inner stimulus. Conveo says so when you try. Two levels is about the length of the chain, not how much can hang off one stimulus: several stimuli can all be balanced within the same one. That’s how you’d keep both category and time of day even within each retailer.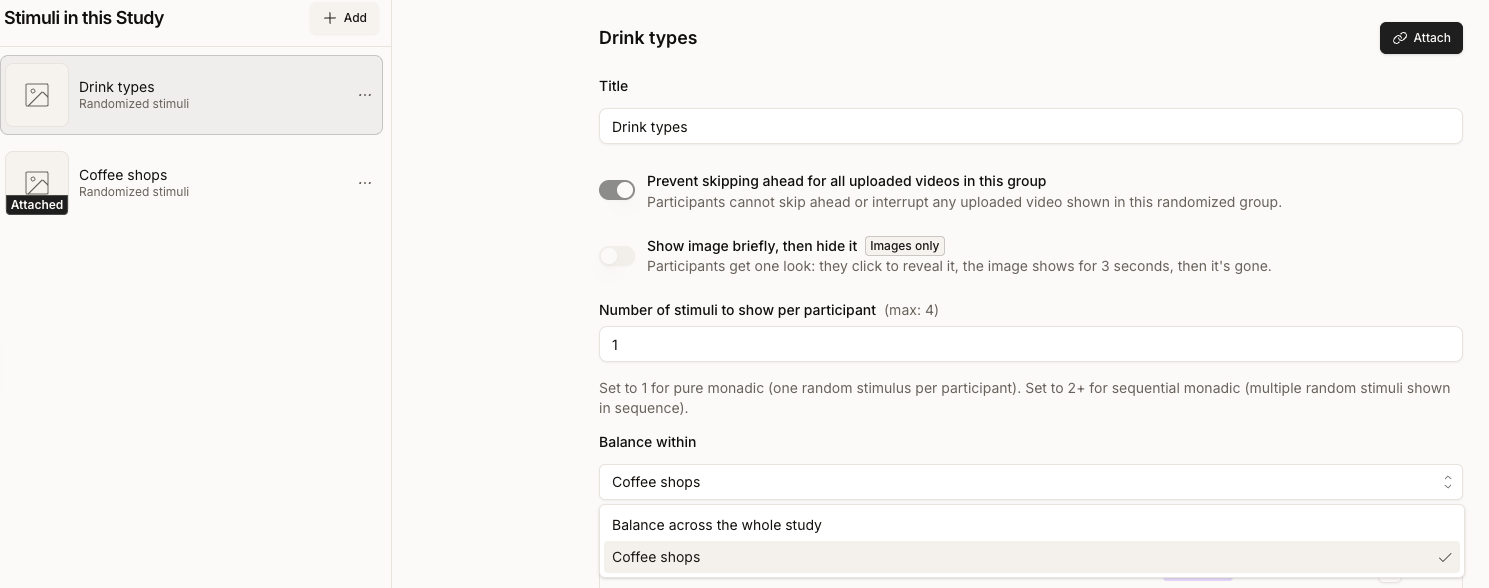
Screener-directed allocation directs the draw using this interview’s screener answers. Diary studies can skip the screener from the second entry onwards. A rule that needs a missing answer makes that concept ineligible; if no eligible concepts remain, the returning participant is screened out. Earlier entries’ answers are not automatically reused for this draw. Talk to your Conveo contact before combining the two.
Multi-Language Support
If your study includes multiple participant languages, you can upload language-specific versions of each stimulus so participants see content in their selected language. Each asset has a default uploaded file and an optional Localized Assets section — open it via the Add translations button on the asset card, or the globe icon on randomized stimulus rows. Then click Add translation, choose the target language (e.g., French), and upload the localized version of the asset. During interviews, Conveo automatically shows the version that matches the participant’s language — no duplicate questions or extra setup needed. If a translation is missing, the default version is shown instead. Translations don’t affect how variants are balanced — Conveo picks the variant for each participant before applying their language, so randomized and sequential monadic designs behave identically across markets. For reliable cross-market results, upload all translations before launching fieldwork and verify every variant has the localized versions you need.Translating Parameter Values
Parameter values (the text that replaces[[ key ]] placeholders) are also translatable. In the stimulus table, click the globe icon next to any parameter cell to open the translations popover. Enter a value per study language, or click Generate translations to have Conveo translate the primary value automatically. At interview time, Conveo picks the value that matches the participant’s language — falling back to the primary-language value when a translation is missing.
Best Practices
- Use clear naming conventions for stimulus sets
- Upload translations before launching multi-language studies
- Use grouping to control experimental structure
- Avoid showing too many stimuli per respondent to reduce fatigue
- Match the stimulus type to your research question
Summary
Stimuli in Conveo enable you to:- Add visual and interactive content to questions
- Compare assets side-by-side
- Run advanced randomized concept tests
- Support multiple languages
- Control exposure logic and grouping
Need help? Contact us at support@conveo.ai